A first 3D Perler bead project: a two-panel standing tree
Build a small tree from two 13×15 panels, 155 beads, complementary slots, and a careful test fit after ironing and cooling.
Start from this guide
Open the editor to make a pattern now, or pick a public pattern to practice the workflow.
Try a small standing tree made from two flat bead panels crossing at right angles. There is no need to bend a finished pattern or use a 3D editor.
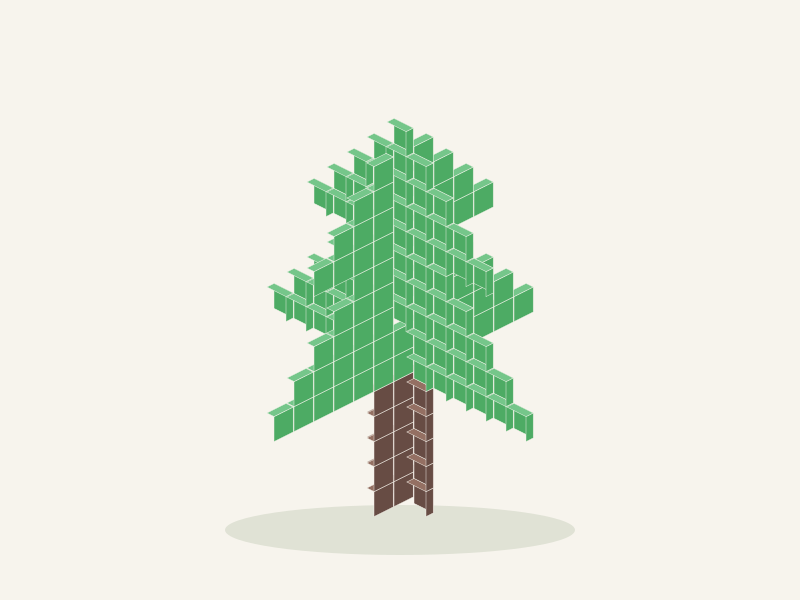
This diagram is drawn from the actual panel grids. It shows the intended arrangement, not a physical test build. Ironing changes thickness and edges, so a test fit is part of the process.
1. Prepare the panels and materials
Both panels are 13 beads wide and 15 high, using the site's Perler palette and matching 5 mm beads. Each fits a 29×29 square board and can be made separately.
- Panel A: 78 beads — 68 green P07 and 10 brown P10.
- Panel B: 77 beads — 62 green P07 and 15 brown P10.
- Total: 155 beads — 130 green P07 and 25 brown P10.
Prepare tweezers, ironing paper, a suitable iron, and a flat weight. If the finished joint needs fixing, use a small amount of glue suitable for the material, following its instructions and testing an edge first.
Chart rows and columns start at 1. These are counted charts, not life-size templates: read the grid rather than using screen or print size to judge board compatibility.
2. Make panel A with a bottom-opening slot
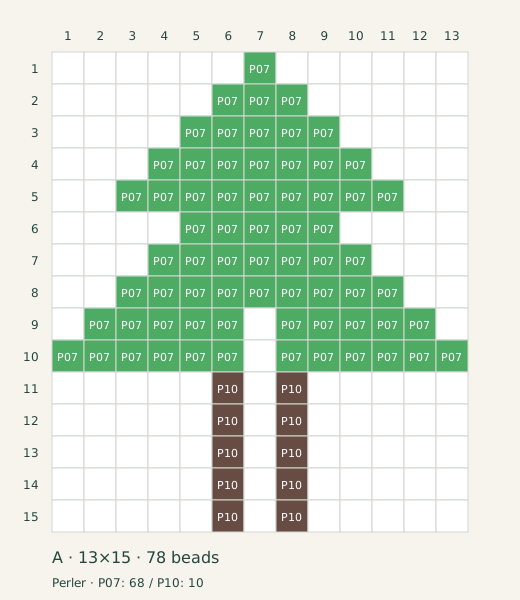
Leave column 7, rows 9–15 empty. The slot opens from the bottom; the trunk sides remain joined through the canopy above it.
Place the canopy, then the brown trunk, and check column 7 row by row so the slot stays empty. Open panel A on its own.
3. Make panel B with a top-opening slot
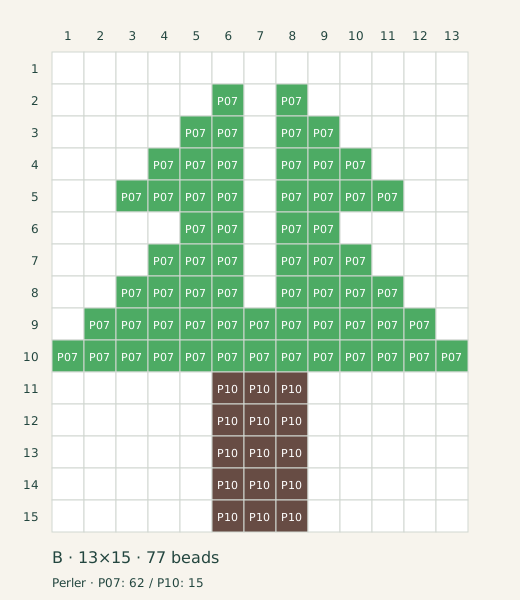
Leave column 7, rows 1–8 empty. This slot opens from the top while the lower trunk stays intact. Panel B is different from A; do not simply make two copies of A.
Check the 77-bead total and the connection below the slot. Open panel B on its own.
4. Iron, flatten, and cool separately
Iron each panel separately, keeping the outlines and slots recognizable. Flatten and let both panels cool completely. Follow the Perler bead ironing guide for the finishing steps.
Do not force the pieces together while warm or flexible. Check the trunks, slot edges, and branches before and after ironing, and avoid melting either slot closed.
5. Turn the panels to a right angle and test fit

Turn the panels about 90 degrees to each other and line up the slots. Bring B's top-opening slot together with A's bottom-opening slot, sliding slowly along the slots until the bottoms sit level. Support the tree on a flat surface before letting go.
The grids have complementary center cells, but this does not guarantee a tight fit after ironing. A slot is one grid cell wide; finished panel thickness depends on the beads and ironing.
If loose, check for missing or broken beads, align the joint, and use a little suitable glue if needed. Let it cure fully. If the slot is tight or distorted, stop rather than forcing it; remaking a distorted panel is preferable to bending it into place.
6. Check before displaying
- Both panel bottoms are level and the surface is flat.
- Trunks and slot edges have no cracks.
- The center joint is stable and any glue has cured.
- The tree does not tip easily; attach it to a flat base if needed.
After the first tree, try recoloring the canopy. Recoloring preserves the slot geometry; changing outlines or slots requires checking the connections and assembly again.
FAQ
Can both panels use the same chart?
No. A opens from the bottom and B from the top; the empty center cells complement each other.
Can I fill the empty slot cells?
No. The pieces will not cross as shown if those cells are filled. Keep A's center empty in rows 9–15 and B's in rows 1–8.
Why is the physical joint loose when the diagram fits?
The grid defines placement, while bead thickness changes during ironing. Test fit first, then decide whether the actual joint needs fixing; a one-cell slot is not a precision snap fit.
Choose another project
Practice flat designs with the Minecraft-inspired collection or Kirby fan patterns. For grid reading and material lists, start with how to use bead patterns.